The freelancer’s dilemma
As a freelancer, it is likely that you are familiar with freelancer marketplaces like Upwork or Freelancer.com.
Either if you are just starting out- or if you are already an established freelancer, these marketplaces may be a nice way to earn a main- or side income.
By generating income using these services (in my current example Upwork) I am sure you already had that feeling of being robbed each time when you wanted to withdraw your earnings.
Therefore, in this post I wanted to share my story with you, and give you detailed advice on what you have to do if you want to minimize the costs of withdrawing money from Upwork.
I am a senior freelance web developer and GIS professional based out of Hungary. I both provide services like we programming, GIS consulting etc. and software products like Make a clickable map. Up until recently I have always been thinking on ways how I could cut my costs of receiving the money I had earned with my projects, not just on Upwork but in general. There was always the dilemma of choosing the method that gave the best exchange rates, lowest service fees etc. but I am going to be honest with you: after a while, thhinking aboutz all these possible methods became overwhelming. At the end I concluded that I am supposed to create web apps, and not constantly brainstorm on ways how I should get the most of my money.
My dilemma seems to have been resolved recently when Transferwise announced the launch of their service, the Borderless Account.
In this article, I am going to teach you how to use this service the way I do, saving you a considerable amount of money.
First I am going to introduce your current withdrawal options from Upwork including all of the incurring costs and fees of each option. Then in the second part of the article, I am going to tell you how I saved a lot of money by using Transferwise Borderless Account, and how you could do the same.
Current withdrawal options on Upwork
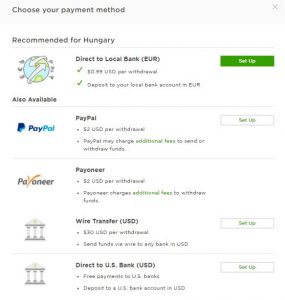
In the past, provided that you are not based in the US, the usual route(s) of your earnings from Upwork to your bank account could be one of these below:
- Upwork to local bank account (Direct to local bank)
- Upwork to Paypal and then your bank account
- Upwork to your Payoneer account
- Upwork to your USD bank account using a wire transfer
- Direct to a U.S Bank
Upwork to local bank account (Direct to local bank)
As its name says, if you choose this option, Upwork sends your money directly to your account.The real problem here is not the $0.99 cost of the transfer itself, but the exchange rate and the fact that for most countries the deposit is made in Euros, which – provided that you are not living in the Euro zone – means a double exchange where your money in USD first gets exchanged to Euros, then from Euros to your local currency. Thus costs could add up pretty quickly. $0.99 + 2-4% on USD-EUR and another 2-4% on EUR-your local currency at a minimum depending on your local bank.
Upwork to Paypal and then your bank account
The cost of sending your money from Upwork to Paypal is $2. Fortunately there are no fees for receiving this money on Paypal, however when you want to withdraw your funds using the horrible exchange rates they use, you are looking to loose at least another 2.6% of your money.
Upwork to your Payoneer account
If you are a Payoneer user, you can withdraw your funds instantly for a $2 fee, which is pretty cool. But then come all the other costs incurred by Payoneer.>First of all, you will be charged another $2.50 for loading your money instantly on your Payoneer card that comes together with your Payoneer membership.Then each time you use your Payoneer card, you are likely to be charged 3.5% of your purchase.
Now, if you want to withdraw your money from Payoneer to your local bank account you can expect another charge of up to 2% in case your local currency is different than the USD/EUR/JPY/GBP/CNY combo or USD/EUR/GBP 1.5 respectively in case the source and target currencies are the same.
It is then easy to see that in the worst case you are going to loose USD 4.5 + 3.5% when you are using Payoneer.
“Note: I was using Payoneer for years and I remember I was constantly wandering what makes my money uploads running out so quickly.”
Now you can figure…
Upwork to your USD bank account using a wire transfer
Due to its $30 cost I don’t think this option is viable for most freelancers.
Direct to a US Bank
Up until this year if you didn’t own a US bank account, this was not even an option that you could consider. And even if you could, you should have still faced the issue of the high exchange rates that banks charged if you wanted to move your money to an account with a different currency.
So what did I do to minimize the costs of getting my money? Introducing Transferwise and the Borderless Account
Recently I started using Transferwise, which is a service provided by a relatively new fintech company that was funded by two friends who believed that money was meant to flow freely around the World. Find out more about Transferwise
Ever since this service has been launched, it offered users the ability to send various currencies to each other with much(!!!) lower fees than what banks charged at the time and what they still charge today.
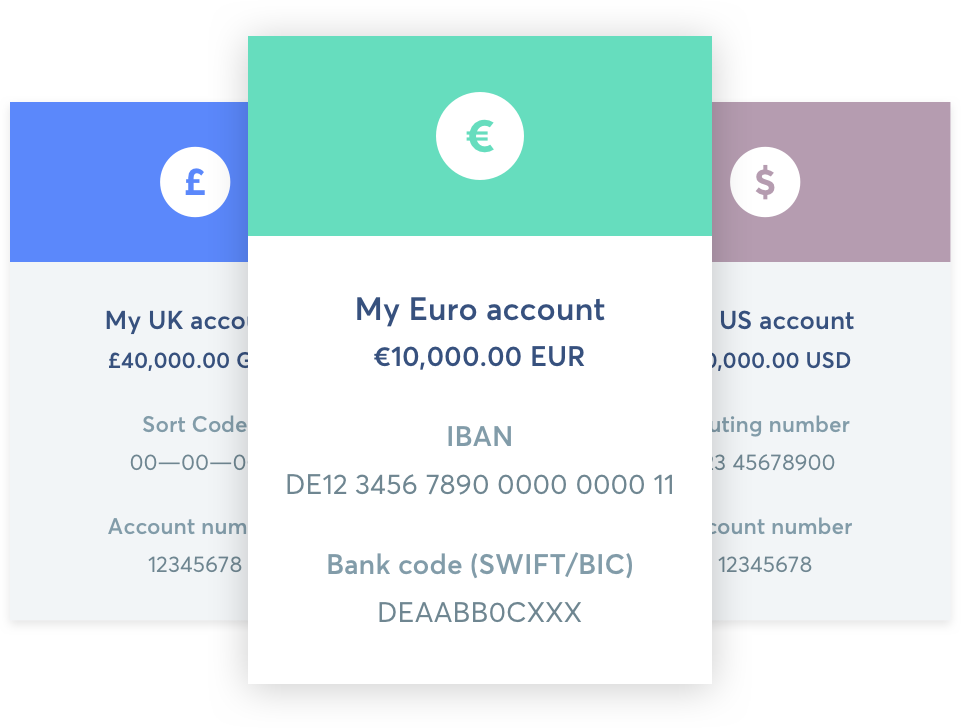
Then in 2017 Transferwise launched a new service, the Borderless Account. This service provides a number of virtual bank accounts (currently available in USD, GBP and EUR) that can be used to receive payments as if the user were a local, having a local bank account. And all this comes for free. At this point it became really interesting for me.
So there are a couple of virtual bank accounts available which was not really new news. Even Payoneer offered virtual USD and EUR accounts way before Transferwise. The big difference was of course the costs. As you might have read above, Payoneer had its own pricing (some folks call it expensive, while others call it directly insane), while using a Borderless Account you can receive funds in USD, EUR and and GBP for FREE. After you receive your funds to your virtual bank account free of charge, it is time to move your money to your local account.
The fees for moving a USD amount from your Borderless Account to a local bank account, converted to a local currency are as follows (as described on the Transferwise website):
For USD transfers to 0.5% and 0.7% currencies (except INR see below) (e.g. EUR, CHF, NZD, CZK etc.), the pricing is as follows:
- For transfers up to $300, our fee is a flat $3.
- For transfers up to $5000, our fee is 1% of the amount sent (so up to $50).
- And on any amount over the initial $5000, our fee is 0.7%.
So, for a $6000 transfer, our fee would be 1% for the first $5000. Then for the additional $1000, the fee would be 0.7%. This means our entire take would be 57USD (50 + 7).
So you can clearly see that even if you receive a minimal amount of $300, you will still receive local currency equivalent to $297 in your local bank account.
If you ask me, that is pretty cool!
How you can create a Transferwise account and a Borderless Account to receive USD, GBP and EUR
If you liked my story and want to get started, you can sign up to Transferwise by clicking this link or by clicking on the image below.
![]()
[Full disclosure: The link above is an affiliate link that I am using, which means that if you sign up and start using the service, I get a reward from Transferwise. However you are also going to get benefits by signing up through this link such as one free transfer. So provided that you want to transfer a bigger amount like the one in the example above, it will save you as much as $57]
How you can connect your Borderless Account to your Upwork account
In my opinion, this is the most interesting part. If you take a look at the picture at the very top of this post that lists the disbursement methods provided by Upwork, you will see the last option:Direct to U.S. bank (USD)

Basically what you will be doing is setting up this option to use you USD Borderless Account you have created in the previous step.
Below is a short-, step by step guide with pictures. After you complete it, you will be able to receive your money from Upwork to your local bank account with the lowest cost currently known.
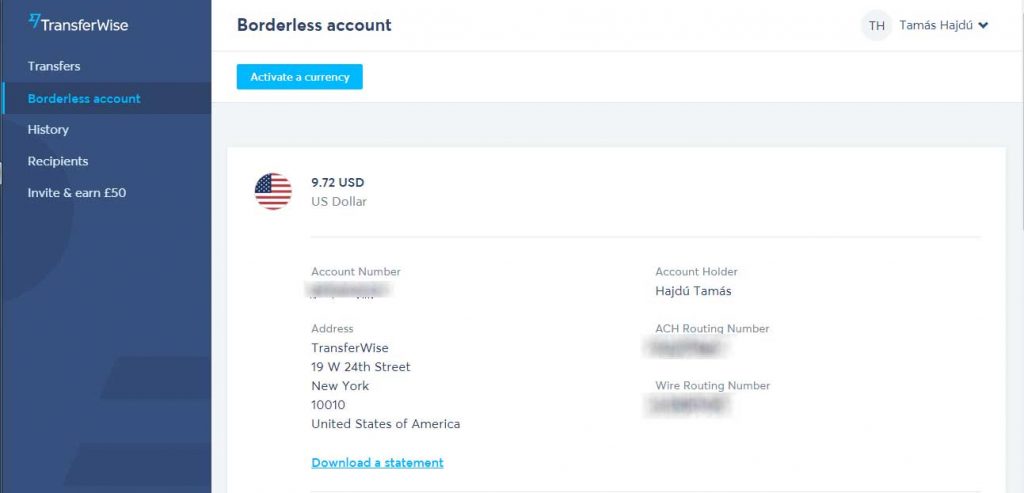
Step 0 – Get Borderless account details
Get the details of your Borderless USD account by logging in to your Transferwise account and by clicking on the Borderless account menu on the left. You should see a screen similar to the one below. All the details that you need to input to the Upwork form in Step 1 are listed here.
Step 1 – Add a new disbursement method in Upwork
In Upwork, go to Settings>Get Paid>Add Method>Direct to U.S. Bank (USD)>Set Upand you will be prompted with the screen below.
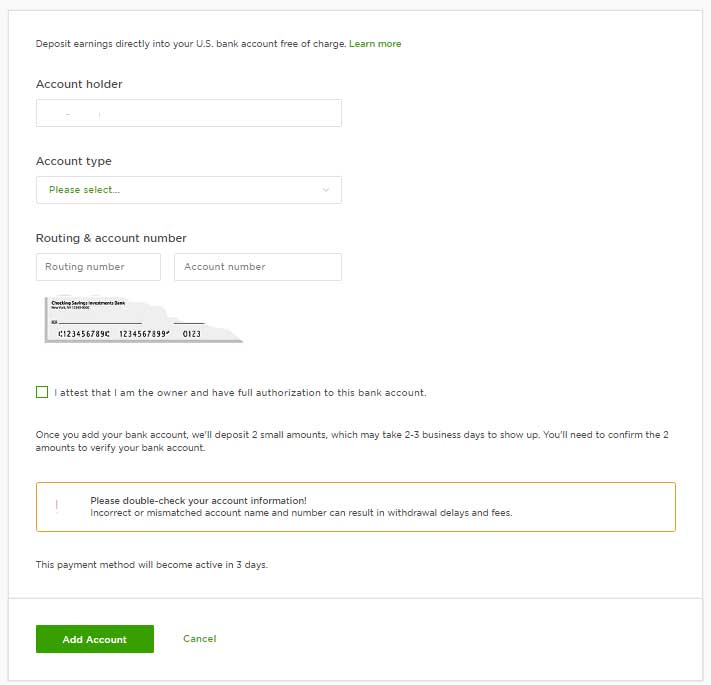
This is the form that you will have to enter the details of your virtual USD bank account provided by your Transferwise Borderless Account.
In this form the value of the Account holder field should be exactly match the Account holder field on your Borderless USD account page.
The Account Type field value should be set to Individual Checking provided that you are a solo freelancer and not a company.
To the Routing number field, you should paste the value under the ACH Routing number on your Borderless USD account page, and to the Account Number field you will need to copy the value under the Account Number.
Once you are all done with providing the bank account details, you will need to check the checkboxes to attest that you are the owner of the bank account and that you have full authorization to it.When all fields are filled out and checked, you just have to push the Add Account button.
Step 2 – Verify your newly added account in Upwork
Upwork is going to send you two separate amounts of a couple of USD cents within a maximum of 2 to 3 business days. (Note: In my case it was 1 business day)
You can check for these credits by clicking on the History menu in your Borderless account. Once you receive these credits, all you have to do is verifying your bank account in Upwork by keying in these two amounts.
Step 3 – Wait for your first transfer
Provided that you keyed in those two amount successfully, you will be able to use this new disbursement method in about 3 business days. It is certainly not as fast as withdrawing your money to your Payoneer card, but you keep a lot of your money in exchange.
Congratulations!
Conclusion
I seriously hope that by writing this article I could help fellow freelancers so that they could focus more on their work and what they are best rather than ways of how to keep their hard earned money. If you have any questions or comments, feel free to leave a comment and I will do my best to answer you.
Thank you so much Tamas. This will really help me.
I would like to know if this is still working on upwork?
Thanks
Tamás,
Thank you for this awesome post!
I have a question for you though: when you work through Upwork, do you invoice Upwork itself or the clients? (but in this case, what about VAT- numbers and the fact that the amount that you invoice for doesn’t match the amount that you get because of the Upwork fees).
Would love your input on this since I’m going around in circles for weeks and every accountant tells me a different story…
Csaba
Hi there Csaba,
You are welcome and I am happy that you found my post useful!
As a rule of thumb, you always have to display the amount on your invoice that you originally bill the client for. My accountant informed me that the amount of money Upwork takes away from the contract amount is basically an expense. In practice that means that say you work on a micro gig for $500. Upwork now takes 20% (100$). on your invoice you still need to display the 500$ because that is what you made from the gig eventually. Too bad if you are using a business setup in which expenses cannot be deducted. Regarding the recipient of the invoice I am not quite sure.
As far as I know Upwork sends an invoice to the client as well by the time the client funds the project. Thus I think it would not make sense to invoice the client directly. not to mention that most of them don’t specify address details in their profile. I think it is something you should ask Upwork first.